Mastering Natural Landscapes with 6 Pine Tree Photoshop Brushes
Creating a convincing outdoor environment in digital art often hinges on the smallest details. When you are building a forest scene or adding depth to a mountain range, the difference between a flat, artificial look and a breathing, organic landscape usually comes down to how you handle your foliage. This is where a specialized set of 6 Pine Tree Photoshop Brushes becomes an invaluable asset for creators ranging from hobbyists to professional marketers. These tools are designed to replicate the irregular, textured forms of real pine trees, allowing you to paint nature rather than just placing static images. However, simply downloading the files is not enough; understanding how to integrate them into your workflow is what separates amateur composites from polished masterpieces.
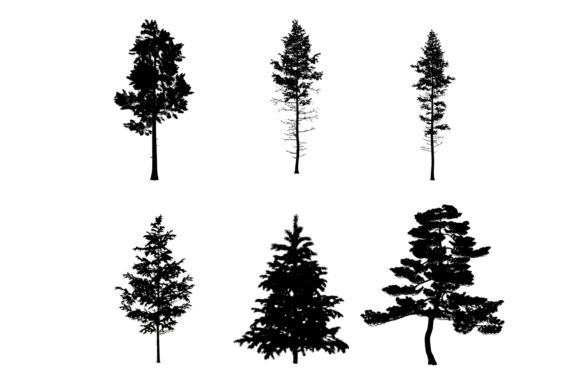
The primary appeal of this specific brush set lies in its versatility. Included in the single .abr file are six unique variations that mimic real-life conifer shapes. Whether you are a blogger needing a rustic background for a post, an educator creating visual aids for biology, or a freelancer designing a travel brochure, these brushes offer a shortcut to high-quality results. Yet, many users overlook the nuance required to make them look authentic. A common misconception is that a "realistic" brush does all the work automatically. In reality, relying on a single stamp size or full opacity often leads to repetitive patterns that the human eye immediately identifies as fake. To truly benefit from these 6 Pine Tree Silhouettes Photoshop Brushes, you must approach them as dynamic tools rather than static stickers.
Avoiding the Trap of Uniformity
One of the most frequent mistakes artists make when using tree brushes is applying them with uniform settings. It is tempting to pick a brush, select a color, and click repeatedly across the canvas. The result, however, is a row of identical trees that looks more like a production line than a forest. This lack of variation destroys the illusion of depth and scale. When every tree has the exact same silhouette and density, the brain recognizes the pattern instantly, breaking the immersion of your outdoor environment scene.
To correct this, you need to embrace variability. The set includes six different shapes for a reason. You should actively rotate between them, but go further by adjusting the size of each stroke. In nature, no two trees are identical in height or width. Try scaling your brush up and down randomly as you paint. Furthermore, never leave the opacity at 100%. Real pine trees have gaps where light filters through, and their edges are rarely solid blocks of color. By lowering the opacity to somewhere between 60% and 85%, you allow underlying layers or sky backgrounds to peek through, creating a sense of translucency and atmospheric perspective.
The Importance of Layer Management
Another critical area where efficiency is often lost is layer organization. Beginners frequently paint all their vegetation onto a single background layer. While this seems faster initially, it creates significant problems later if you need to adjust the position of a specific tree or change the color tone of the foreground without affecting the sky. If you realize halfway through a project that a cluster of pines looks too dark or obstructs a key design element, fixing it on a flattened layer can be tedious and destructive to your image quality.
The professional approach is to paint each tree or small group of trees on individual layers. This practice might seem time-consuming at first, but it pays dividends in flexibility. With separate layers, you can easily move a tree to improve composition, apply a specific blur filter to simulate distance, or tweak the hue to match the lighting of your scene. For entrepreneurs and small business owners who may need to update marketing materials quickly, this non-destructive workflow ensures that you can adapt your visuals without starting from scratch. Think of each layer as a movable piece in a puzzle; the more control you have over individual pieces, the better the final picture fits together.
Understanding Scale and Context
Context is king when using digital assets. A frequent oversight involves ignoring the scale of the brushes relative to the rest of the image. Users sometimes drop a massive pine tree into a scene where the horizon line suggests a distant view, or conversely, place tiny saplings in a foreground meant for close-up inspection. This mismatch confuses the viewer's sense of space. Before you start brushing, take a moment to evaluate the perspective of your base image. Are you looking up at a canopy, or across a valley?
If you are working on a distant background, use smaller brush sizes and lower contrast. Atmospheric haze causes distant objects to appear lighter and less detailed. Conversely, foreground elements should be larger, sharper, and have higher contrast. The 6 Pine Tree Photoshop Brushes are capable of handling both scenarios, but only if you manually adjust their properties to fit the spatial logic of your artwork. Do not assume the default size is correct; always test a stroke on a temporary layer to check the scale before committing to the final design.
Color Theory and Environmental Integration
Even the best brushes will look out of place if the color palette is off. A common error is using pure green or black for tree silhouettes. In the real world, pine trees reflect the colors of their environment. They might have hints of blue from the sky, yellow from the sun, or even purple shadows depending on the time of day. Using a flat, saturated green often makes the trees look like plastic cutouts pasted onto the screen.
To achieve a seamless blend, sample colors directly from your existing environment. If your sky is a warm sunset orange, your trees should reflect some of that warmth in their highlights. Use the eyedropper tool to pick tones from your background and apply them subtly within the tree strokes. Additionally, consider using a soft eraser or a mask to fade the bottom of the trees into the ground or fog, avoiding that harsh "floating" look. This attention to color harmony ensures that your nature background feels cohesive and grounded.
Making the Right Choice for Your Project
Before diving into any project, it is wise to evaluate whether these specific tools meet your needs. While this set of 6 Pine Tree Silhouettes Photoshop Brushes is excellent for general outdoor scenes, it is important to recognize its scope. These brushes are optimized for standard pine forms; if your project requires specific species like weeping willows or tropical palms, you would need different assets. However, for most temperate forest scenes, mountain vistas, and rustic designs, this collection provides a robust foundation.
When downloading and installing the .abr file, ensure your version of Adobe Photoshop is up to date to avoid compatibility glitches. Once installed, take five minutes to test each of the six brushes on a blank canvas. Get a feel for how they respond to pressure sensitivity if you are using a tablet, and note which shapes work best for dense clusters versus solitary trees. This small investment of time prevents frustration later when you are under a deadline.
Ultimately, the goal is to enhance your creative efficiency without sacrificing quality. By avoiding the pitfalls of repetition, poor layer management, and incorrect scaling, you can transform a simple brush set into a powerful engine for creating stunning visuals. Whether you are a marketer crafting an ad campaign or an artist exploring digital landscapes, mastering these tools allows you to focus on the story your image tells, rather than struggling with the mechanics of drawing every needle and branch by hand. Embrace the flexibility these brushes offer, experiment with opacity and size, and watch your digital forests come to life with natural ease.